When Sissy was just 16 months old, I joined a mom's group. We had play dates, went to the zoo, picked pumpkins, celebrated Halloween and Christmas and Easter together, but what began as socialization for our kids grew into wonderful mommy friendships. Over the years we raised our kids together, shared advice, offered support, and just enjoyed each others company. As our kids got older, they went to different pre-schools and then kindergartens and it became increasingly difficult to see one another. Unfortunately, as we drifted apart geographically, we needed each other emotionally more than ever. Now, our one saving grace is our continued interaction on Facebook. We have a group page where we can share our gripes, triumphs, pitfalls, struggles, and joys.
This last week, nearly every mommy was having a tough time. Kids were sick, schedules were draining, life was demanding, and then a miracle happened! Moms in the group started receiving loaves of homemade banana bread on their porches or mailboxes with notes that simply read, "A Sweet Treat From the Mama's". Okay, banana bread may not sound like a miracle, but when you've had a tough week, the kids have been crying for 2 hours, and you're covered in snot, the fact that someone took the time to bring you a treat IS A MIRACLE! As each mama would receive her loaf she would post something to the Facebook page, and we would all share in that new joy. With something as simple as a loaf of bread, our weeks were changed. We all watched to see who would get the next loaf, we all guessed who the mysterious baker was, and we all ate delicious bread. Beyond the tangible gift of the bread, we received an intangible gift too... a chance to feel like a part of something, a chance to be distracted from the rigors of daily life, a chance to remember the impact a small gift can make!
I can't help but imagine how different our lives would be if we each took the time to be a "mysterious baker". I know that I have learned the value of a beautiful, amazing, perfect, and perhaps not so random act of kindness. Now, its time to pay it forward!

Friday, October 25, 2013
Tuesday, October 22, 2013
Egg Cups
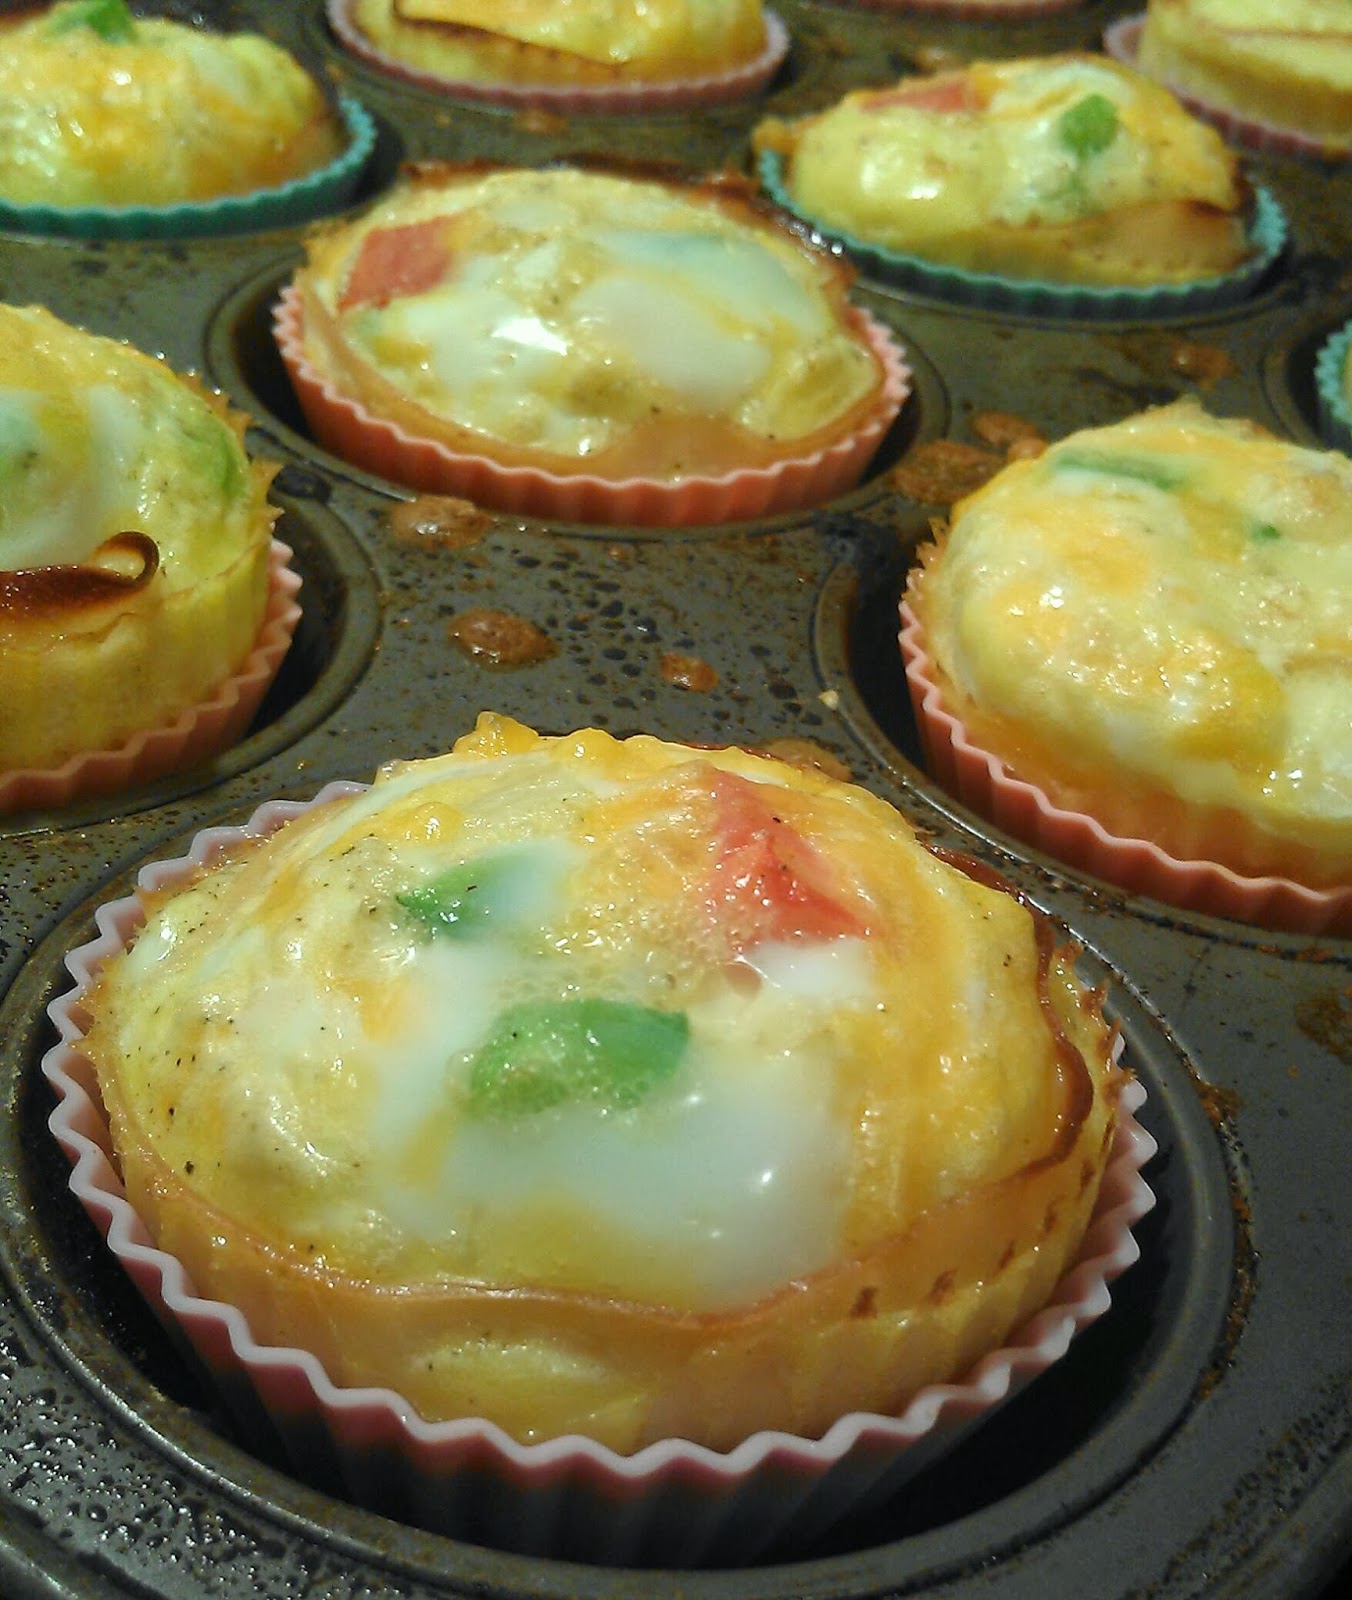
Egg Cups (makes 12 cups)
Ingredients:
- 9 eggs
- 1/4 cup milk
- 12 slices deli ham (or turkey)
- 1 cup shredded cheese
- diced veggies of your choice (tomato, onion, green pepper, spinach, & broccoli all work well)
- salt and pepper to taste
- 12 silicone baking cups
- Preheat oven to 375 degrees. Place 12 silicone baking cups in a cupcake tin. (While this step is optional, I have never made the egg cups without the silicone liners, so I have no idea how hard it might be to get the frittatas out of the tin.) Line each cup with a slice of ham. Add a pinch of cheese and diced veggies to each cup. For this batch I added tomato, green pepper, and onion.

- Whisk together eggs, milk, and salt and pepper until well blended. Pour egg mixture evenly into each cup. Bake for 20-25 minutes.
 Yummy, don't they look wonderful? Comment with your favorite frittata veggie and we'll try it next time!


Friday, October 18, 2013
3D Paper Pumpkin Mobile

3D Paper Pumpkins
 Supplies:
- Orange, green and brown construction paper
- Scissors
- Stapler
- String to hang
- Cut the orange paper into 8 even strips. Cut a 4 in by 1 in piece of brown paper and a leaf from the green paper.

- Cross the tips of the orange strips, overlapping the ends by 1 inch until you form a circle. Staple.

- Cross the bottom ends of the strips in the same manner. Staple. Tip: if you have trouble getting the stapler in the bottom, press the pumpkin down on the table to flatten it out a bit. You should then be able to sneak the stapler in.

- Fold the brown piece in half and fold a half inch foot near the bottom. Place the leaf over the foot and staple to the top of the pumpkin.

- String up several pumpkins for a 3D pumpkin mobile.


Tuesday, October 15, 2013
Jar O'Lanterns
 We love to decorate for the holidays... any holiday, every holiday... but especially Halloween (and well Christmas, but you get the point)!
 I had seen these cute jar o'lanterns, but with Sissy in school we haven't had much time for crafting. Yesterday I took advantage of Sissy being home sick, and we made some adorable Halloween decor. The supplies are cheap, the process simple, and the effect is quite charming.
Jar O'Lanterns
Supplies:
- glass jars
- orange acrylic paint
- stickers & painters tape
- paint brushes
- tea light candles
- Using stickers or painters tape, make a jack o'lantern face on each jar. We picked different size jars and made one for each member of the family. We used Halloween themed stickers to construct the eyes and noses and I cut the mouths out of painters tape.

- Paint each jar with an even coat of orange acrylic paint.

- Let the paint dry, then remove the stickers and tape.

- Place a tea light in each jar and light!


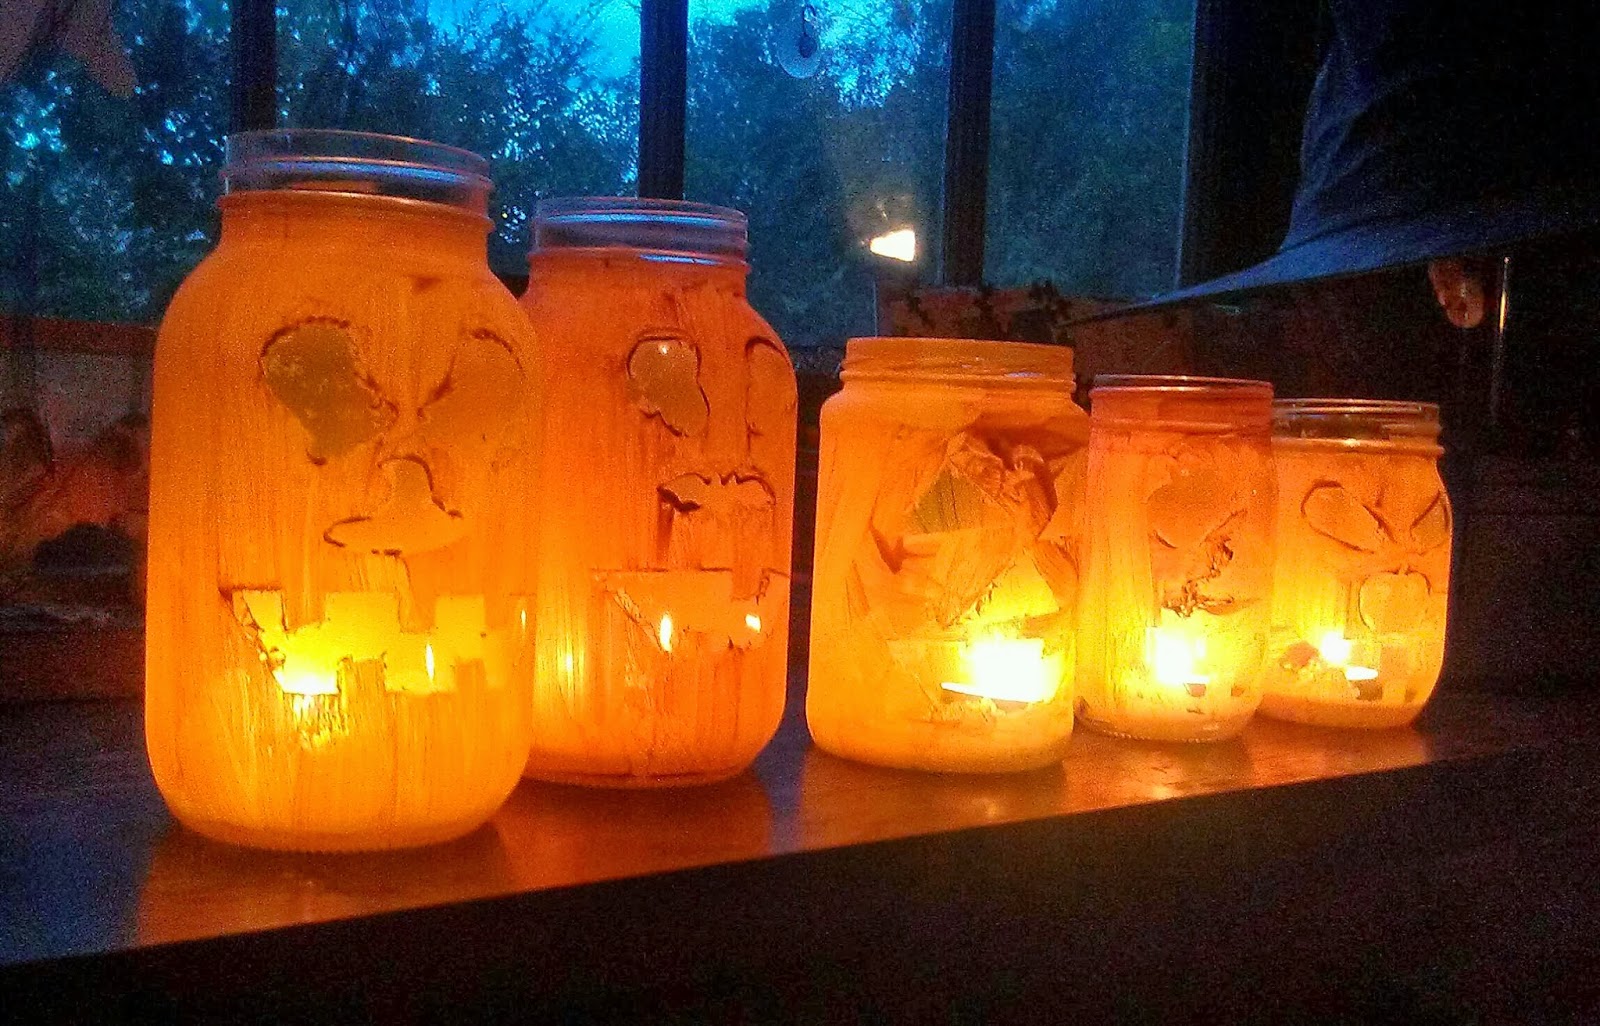
Have fun creating your own jar o'lanterns. Oh, and please share your favorite Halloween craft in the comments! We need a little more decor!
Thursday, October 10, 2013
Baked Chimichangas
I keep waiting to settle into the school routine, but so far, every day seems a little crazy! Maybe one day we'll adjust. For now, just getting to soccer practice, managing homework, folding laundry, school pick up, and making dinner seems like a miracle. While I hope everyone else is fairing better, I imagine most families are very busy this time of year. With that in mind, here is a quick recipe that can be prepared in just a few minutes, prepped in advance, taken on the road, and my family loves.
Baked Chimichangas
Ingredients:

This dish also travels very well. Allow the chimichangas to cool a bit and the cheese will help hold it all together. Bring sour cream and salsa on the side for dipping, and its the perfect dinner to eat at the soccer field.
I hope your family enjoys it as mine!
Baked Chimichangas
Ingredients:
- 1 lb. ground turkey
- 1 lb. mixed frozen veggies chopped fine (Birdseye Normandy Blend)
- Taco seasoning (Taco Bell Chipotle Flavor Mix)
- Tortillas
- Shredded cheese
- Butter
- Sour cream
- Salsa
- Preheat oven to 400 degrees F. Cook ground turkey in a saute pan over medium heat until cooked though. Microwave veggies in a covered dish with a bit of water for 5 minutes. Drain water and chop. Add veggies to turkey and prepare taco seasoning according to package directions.
- Layer shredded cheese and turkey mix on each tortilla. I use burrito size tortillas for adults and fajita size for the kids. Fold in the ends and roll like a burrito. Place on a baking pan and spread the outside of the tortilla with a half teaspoon of butter. The butter is optional, but the tortilla will not crisp as well without it.
- Bake for 20 minutes.
- Serve topped with sour cream and salsa.


This dish also travels very well. Allow the chimichangas to cool a bit and the cheese will help hold it all together. Bring sour cream and salsa on the side for dipping, and its the perfect dinner to eat at the soccer field.
I hope your family enjoys it as mine!
Tuesday, October 1, 2013
Carrot Cake Pancakes

I have continued the tradition with my family. Rain or shine, we have pancakes on Saturday morning. It has become such a fixture in our house that the ritual provides stability even during uncertain times. For instance, nine months pregnant with the twins, I made pancakes sitting on a stool. The day after we brought them home, Daddy made our pancakes. If we've had a bad day, its breakfast for dinner! So, after years of pancakes, its seems only appropriate to share our recipe here. This is one adaptation of The Joy of Cooking's Basic Pancake recipe.
Carrot Cake Pancakes
Ingredients:
- 1 1/2 cups all purpose flour
- 3 tablespoons sugar
- 1 1/2 teaspoons baking powder
- 1/2 teaspoon baking soda
- 1/2 teaspoon cinnamon
- 1/2 teaspoon salt
- 1 1/2 cups buttermilk
- 3 tablespoons butter, melted
- 2 large eggs
- 1/2 teaspoon vanilla
- 1 large carrot, finely grated
- 1/2 cup raisins
- 1 cup chopped pineapple for garnish
- Cream cheese frosting

- Whisk together dry ingredients in a large bowl.
- Whisk together wet ingredients. When mixed, add carrot and raisins.
- Mix wet and dry ingredients until just combined.
- Scoop 1/3 cup of batter for each pancake onto a pre-heated griddle. Cook until bubbles form and some have popped open. Flip and cook until underside is slightly browned.
- Spread each pancake with a bit of cream cheese frosting (yes, it will melt), stack up several pancakes, top with pineapple, and serve!


Subscribe to:
Comments (Atom)