Monday, November 4, 2013

Turkey Garland

Yesterday we packed up all the Halloween decorations, and the twins woke up from their nap crying about the missing pumpkins, spiders, rats, and bats.  In fact, the house felt so empty, we started to decorate for Thanksgiving right away.  Sissy decided on a turkey theme for this year and informed me that we need hundreds of turkeys.  I'm not sure we'll end up with quite that many, but I found several turkey crafts to get us started.  We didn't have much time to craft, so Sissy and I started with a very easy project.  I found this cute turkey paper doll on Cupcakes and Crinoline, and decided to make a little turkey garland.  Here's how we did it!

Turkey Garland
Supplies:
  • Turkey template
  • Card stock
  • Markers
  • Scissors
  • Craft foam (optional)
  • Hot glue gun
Method:
  1.  Print the template on card stock.  (I had to copy the picture, paste it into Word, and resize it.)
  2. Color the turkey.  Sissy and I experimented with feather patterns and lots of fun colors.  After you color all the pieces, cut them out.

  3. Cut up small squares of craft foam.  Glue two layers of craft foam to the back of the head, body and wings with a hot glue gun.  The craft foam is optional, but if provides a little depth for the turkey.  Then glue each piece onto the turkey where you want them.  Glue the feet to the back of the large round feathers.

  4. Repeat steps 1-3 until you have as many turkeys as you want.  Hang them from a string with tiny clothespins for a cute and festive garland!

We made four turkeys yesterday, but will probably add to our flock.  I'll post an updated picture of the garland when its complete.  Please share your favorite turkey craft with us and we'll make it!

Happy November!


Friday, October 25, 2013

Random Acts of Kindness

When Sissy was just 16 months old, I joined a mom's group.  We had play dates, went to the zoo, picked pumpkins, celebrated Halloween and Christmas and Easter together, but what began as socialization for our kids grew into wonderful mommy friendships.  Over the years we raised our kids together, shared advice, offered support, and just enjoyed each others company.  As our kids got older, they went to different pre-schools and then kindergartens and it became increasingly difficult to see one another.  Unfortunately, as we drifted apart geographically, we needed each other emotionally more than ever.  Now, our one saving grace is our continued interaction on Facebook.  We have a group page where we can share our gripes, triumphs, pitfalls, struggles, and joys. 

This last week, nearly every mommy was having a tough time.   Kids were sick, schedules were draining, life was demanding, and then a miracle happened!  Moms in the group started receiving loaves of homemade banana bread on their porches or mailboxes with notes that simply read, "A Sweet Treat From the Mama's".  Okay, banana bread may not sound like a miracle, but when you've had a tough week, the kids have been crying for 2 hours, and you're covered in snot, the fact that someone took the time to bring you a treat IS A MIRACLE!  As each mama would receive her loaf she would post something to the Facebook page, and we would all share in that new joy.  With something as simple as a loaf of bread, our weeks were changed.  We all watched to see who would get the next loaf, we all guessed who the mysterious baker was, and we all ate delicious bread.  Beyond the tangible gift of the bread, we received an intangible gift too... a chance to feel like a part of something, a chance to be distracted from the rigors of daily life, a chance to remember the impact a small gift can make!

I can't help but imagine how different our lives would be if we each took the time to be a "mysterious baker".  I know that I have learned the value of a beautiful, amazing, perfect, and perhaps not so random act of kindness.  Now, its time to pay it forward!


Tuesday, October 22, 2013

Egg Cups

Every school morning is a race against the clock at our house.  Trying to get five people fed and dressed and out the door by 7:25 sometimes feels like an insurmountable task.  Despite the rush, I hate just feeding the kids cereal because I strongly believe breakfast is the foundation for your day.  So, I try to find meals that I can prep in advance and easily serve in the morning.  These individual frittatas, or egg cups as we call them, are perfect!  I ran across a recipe for mini frittatas at spoonful.com and adapted them a bit. One cup is the perfect serving size for a kid, you can customize the recipe to whatever your family likes, they travel well, and best of all, they are delicious!

Egg Cups (makes 12 cups)
Ingredients:
  • 9 eggs
  • 1/4 cup milk
  • 12 slices deli ham (or turkey)
  • 1 cup shredded cheese
  • diced veggies of your choice (tomato, onion, green pepper, spinach, & broccoli all work well)
  • salt and pepper to taste
  • 12 silicone baking cups
Method:
  1. Preheat oven to 375 degrees.  Place 12 silicone baking cups in a cupcake tin.  (While this step is optional, I have never made the egg cups without the silicone liners, so I have no idea how hard it might be to get the frittatas out of the tin.)  Line each cup with a slice of ham.  Add a pinch of cheese and diced veggies to each cup.  For this batch I added tomato, green pepper, and onion.
  2. Whisk together eggs, milk, and salt and pepper until well blended.  Pour egg mixture evenly into each cup.  Bake for 20-25 minutes.


    Yummy, don't they look wonderful?  Comment with your favorite frittata veggie and we'll try it next time! 

Friday, October 18, 2013

3D Paper Pumpkin Mobile

Sissy and I put together another cute Halloween craft today... 3D paper pumpkins!  They go great with our pumpkin decorating theme this year, only took a few minutes, and look really cute!


3D Paper Pumpkins
Supplies:
  • Orange, green and brown construction paper
  • Scissors
  • Stapler
  • String to hang 
Method:
  1. Cut the orange paper into 8 even strips.  Cut a 4 in by 1 in piece of brown paper and a leaf from the green paper.
  2. Cross the tips of the orange strips, overlapping the ends by 1 inch until you form a circle.  Staple.
  3. Cross the bottom ends of the strips in the same manner. Staple. Tip: if you have trouble getting the stapler in the bottom, press the pumpkin down on the table to flatten it out a bit.  You should then be able to sneak the stapler in.
  4. Fold the brown piece in half and fold a half inch foot near the bottom.  Place the leaf over the foot and staple to the top of the pumpkin.
  5. String up several pumpkins for a 3D pumpkin mobile.


Tuesday, October 15, 2013

Jar O'Lanterns

We love to decorate for the holidays... any holiday, every holiday... but especially Halloween (and well Christmas, but you get the point)!  

I had seen these cute jar o'lanterns, but with Sissy in school we haven't had much time for crafting.  Yesterday I took advantage of Sissy being home sick, and we made some adorable Halloween decor.  The supplies are cheap, the process simple, and the effect is quite charming.  

Jar O'Lanterns
Supplies:
  • glass jars
  • orange acrylic paint
  • stickers & painters tape
  • paint brushes
  • tea light candles
 Method:
  1. Using stickers or painters tape, make a jack o'lantern face on each jar.  We picked different size jars and made one for each member of the family.  We used Halloween themed stickers to construct the eyes and noses and I cut the mouths out of painters tape.
  2. Paint each jar with an even coat of orange acrylic paint. 
  3. Let the paint dry, then remove the stickers and tape.
  4. Place a tea light in each jar and light!

Have fun creating your own jar o'lanterns.  Oh, and please share your favorite Halloween craft in the comments!  We need a little more decor!


Thursday, October 10, 2013

Baked Chimichangas


I keep waiting to settle into the school routine, but so far, every day seems a little crazy!  Maybe one day we'll adjust.  For now, just getting to soccer practice, managing homework, folding laundry, school pick up, and making dinner seems like a miracle. While I hope everyone else is fairing better, I imagine most families are very busy this time of year.  With that in mind, here is a quick recipe that can be prepared in just a few minutes, prepped in advance, taken on the road, and my family loves.  

Baked Chimichangas
Ingredients:
  • 1 lb. ground turkey
  • 1 lb. mixed frozen veggies chopped fine (Birdseye Normandy Blend)
  • Taco seasoning (Taco Bell Chipotle Flavor Mix)
  • Tortillas
  • Shredded cheese
  • Butter
  • Sour cream
  • Salsa
Method:
  1. Preheat oven to 400 degrees F.  Cook ground turkey in a saute pan over medium heat until cooked though.  Microwave veggies in a covered dish with a bit of water for 5 minutes.  Drain water and chop.  Add veggies to turkey and prepare taco seasoning according to package directions.
  2. Layer shredded cheese and turkey mix on each tortilla.  I use burrito size tortillas for adults and fajita size for the kids.  Fold in the ends and roll like a burrito.  Place on a baking pan and spread the outside of the tortilla with a half teaspoon of butter.  The butter is optional, but the tortilla will not crisp as well without it.  
  3. Bake for 20 minutes.  
  4. Serve topped with sour cream and salsa. 


This dish also travels very well.  Allow the chimichangas to cool a bit and the cheese will help hold it all together.  Bring sour cream and salsa on the side for dipping, and its the perfect dinner to eat at the soccer field.

I hope your family enjoys it as mine!


Tuesday, October 1, 2013

Carrot Cake Pancakes

When I was a little girl, my Dad made pancakes on Saturday mornings.  It is one of my favorite memories of my childhood!  I loved watching him measure out the dry goods, I loved that the page in the cookbook always had a thin dusting of flour, and I loved the smell of pancakes on the griddle.  

I have continued the tradition with my family.  Rain or shine, we have pancakes on Saturday morning.  It has become such a fixture in our house that the ritual provides stability even during uncertain times.  For instance, nine months pregnant with the twins, I made pancakes sitting on a stool.  The day after we brought them home, Daddy made our pancakes.  If we've had a bad day, its breakfast for dinner!  So, after years of pancakes, its seems only appropriate to share our recipe here.  This is one adaptation of The Joy of Cooking's Basic Pancake recipe.

Carrot Cake Pancakes

Ingredients:
  • 1 1/2 cups all purpose flour
  • 3 tablespoons sugar
  • 1 1/2 teaspoons baking powder
  • 1/2 teaspoon baking soda
  • 1/2 teaspoon cinnamon
  • 1/2 teaspoon salt
  • 1 1/2 cups buttermilk
  • 3 tablespoons butter, melted
  • 2 large eggs
  • 1/2 teaspoon vanilla
  • 1 large carrot, finely grated
  • 1/2 cup raisins
  • 1 cup chopped pineapple for garnish
  • Cream cheese frosting
 Method:
  1. Whisk together dry ingredients in a large bowl.  
  2. Whisk together wet ingredients.  When mixed, add carrot and raisins.
  3. Mix wet and dry ingredients until just combined.
  4. Scoop 1/3 cup of batter for each pancake onto a pre-heated griddle.  Cook until bubbles form and some have popped open.  Flip and cook until underside is slightly browned.
  5. Spread each pancake with a bit of cream cheese frosting (yes, it will melt), stack up several pancakes, top with pineapple, and serve!
 

Thursday, September 26, 2013

Handprint Trees

Lately the twins have been wild, climbing the walls wild, so I thought it might be good to funnel some of that energy into an artistic expression.  Today we made handprint trees, and used their little fingerprints as leaves.  It actually turned out pretty well and now we have some cute fall trees hanging on our art wall.  Here's what we did...

Supplies:
  • Paint (washable & non-toxic)
  • Paint brush
  • Paper
  • Small containers (or paint lids) for dipping
Method:
 
First, I painted brown paint onto a cute chubby hand and stamped it a few times to make the branches of the tree.  I had to repaint each hand twice to get enough limbs.  Then, I added in a tree trunk.  

After that, I gave each boy a few small dishes of paint, and showed them how to dip their fingers in and stamp the leaves.  We used yellow, orange, red, magenta, and even a little purple.  The boys stamped leaves on the trees, some falling down, and some on the ground.  Thing 1 was much more interested in eating the paint than stamping, but I helped him a bit.  Thing 2 on the other hand really got into the stamping.  He even repeated, "stamp, stamp, stamp" each time.    

 From start to finish the project took less than 15 minutes, so it was perfect for the 20 month old twins.  Honestly, Sissy was even a little jealous of their art when she got home from school!  Maybe we will do it again with her this weekend.

I'd love to hear from you if you try it with your own little hands!

Happy stamping!

Monday, September 23, 2013

Short Order Saturday

We awoke Saturday to a torrential downpour of rain.  Soccer games were canceled, and we were destined to spend the day indoors.  As we enjoyed apple pie pancakes, it occurred to me that it might be the perfect opportunity for a fun and silly Saturday.  So, I made an announcement, "Name a food, and I'll make it, whatever you want!"  Smiles lit up all around the table, and the brainstorming began.  In a few short minutes the requests were it!  

Sissy and I bundled up, and braved the storm to purchase supplies.  When we got home the cooking began.  Sissy helped me roll the pigs in a blanket.  We started the meatballs in the crockpot, mixed up a queso dip, and enjoyed round one for lunch.  After lunch we made cookies, wings, spaghetti and mac & cheese.  

 
All said and done we ended up with so much delicious food, it seemed only right to share.  We invited over my brothers and had a feast!  We were even able to send some cookies home for my mom.


In the end of course, the food wasn't really important.  What's important is that every day is what you make it, that rainy Saturdays can be transformed into magnificent feasts, that a little food prepared with love can bring joy to everyone around you, and finally, that whatever happens, a day with family is a true blessing!  I am secretly hoping it rains again next weekend, so we can do it again! :)

Happy Monday!

Friday, September 20, 2013

Cowboy Caviar Recipe

Its football season, and in this house that means tailgating!  Okay, well sorta.  Now days tailgating means I make up a some yummy dishes, and the hubs and I attempt to watch a few moments of college football in between playing trains, changing diapers, coaching soccer, and reading board books for the 100th time.  

Anyway, one of my favorite tailgate recipes is Cowboy Caviar.  It is a delicious dip made from black eyed peas, corn, tomatoes, and avocado with a spicy sauce.  Its easy to prepare, keeps for days, and everyone loves it.  I keep most of the ingredients on hand, so I have a quick dish for anything that comes up. 

Cowboy Caviar
Ingredients  
  • 2 tablespoons red wine vinegar
  • 1 tablespoon hot sauce 
  • 1 1/2 teaspoons oil
  • 1 clove garlic, minced
  • 1 firm ripe avocado
  • 1 can (15 oz.) black-eyed peas
  • 1 can (11 oz.) corn kernels
  • 1 can (15 0z.) petite diced tomatoes 
  • 2/3 cup thinly sliced green onions (optional)
  • 2/3 cup chopped fresh cilantro or parsley (optional)
  • Salt and pepper to taste
  • Tortilla chips for serving
Method
  1. In a large bowl, mix vinegar, hot sauce, oil, garlic, and pepper. Peel, pit, and cut avocado into 1/2-inch cubes. Add to vinegar mixture and mix gently to coat.
  2. Drain and rinse black eyed peas thoroughly.  Drain tomatoes and corn. Add black eyed peas, corn, onions, cilantro, and tomatoes to avocado; mix gently to coat. Add salt and pepper to taste. 
  3. Refrigerate for at least 20 minutes or overnight.  Serve Cowboy Caviar with chips.

I hope your family enjoys it as much as we do.

Happy football season! 

Wednesday, September 18, 2013

How to Sell at Consignment Sales


Last week I wrote about shopping consignment sales, and several people asked if I also consign.  I do, and I love it.  Depending on how frugal you are selling and shopping, you can almost clothe your kids for free!  It takes a bit of work, but is certainly worth it if you shop on a budget.  So without further ado... how to sell at consignment sales!  Much of the information presented will be considerably redundant with the last post, so please bear with me.  

First let me cover my general consigning strategy.  I sell at two different sales that take place about three weeks apart.  The first sale is smaller, pickier about the quality of items, and generally brings in more money per item.  I take all my applicable items, price them on the higher side of reasonable, and see what I get from the first sale.  (Side note: Most sales offer a half off sale on the final day, but it is your choice to discount or not.  I do not.)  I generally sell about half of my items, but make a nice amount of money.  The unsold items are already prepped, so I just reduce the price about a dollar each, re-tag them, and try again at the next sale.  It is a bit more work, but I make considerably more than I would by pricing low all along, or by offering my items for 50% off on the final day.

Here are my tips for successfully consigning your children's clothing and gear:

  1. Find a sale in your area!  Just hop on Google and search for children's consignment sales in (your city here). 
  2. Read all the instructions first!  Each sale will only accept specific items.  For instance, you can only sell season appropriate items... coats in the fall, bathing suits in the spring, some only accept 10 pairs of shoes per consignor, some take maternity clothes, some accept car seats, etc.  You will waste a lot of time prepping items that you can't sell if you don't read the list of acceptable items first.  
  3. Follow all the instructions!  This may seem like I am rehashing number two, but it is important.  Each sale will have a very specific set of instructions for preparing and tagging items. 
    If you don't follow the directions, your items may be rejected or you may lose sales.   Hangers must face a certain way and tags must be done according to the template.  Here is an example of a tag.  This particular sale uses hand written tags while some use computer systems.  This may seem complicated, but its easy once you get the hang of it.
  4. Present your items favorably!  This may seem like a no brainer, but your items will sell better if they are clean, wrinkle free (mostly), and are well presented on the hanger.  I use lots of safety pins to assure that my items do not shift or fall off the hanger no matter how many people look at them.
    In fact, sales often request that items be hung a certain way for two reasons.  One, if your item falls off the hanger onto the floor, it will not sell, and two, an item that is securely attached to a hanger is much harder to steal.  So, test each item and make sure it won't fall off no matter what occurs.    
  5. Price reasonably!  This is perhaps the hardest aspects of consigning because of the emotional attachment involved.  No matter how very cute your little one looked in the outfit, try not to price items emotionally.  You will sell more if you price items based on a reasonable scale and ask, "in this condition, what would I pay?"  Here is a wonderful consignment pricing guide to help with fair pricing.
  6. Volunteer!  Consignors generally earn a larger percent of their sales based on how many volunteer shifts they work.  For example, no shifts = 60% of sales, 1 shift = 70%, and 4 shifts = 75%.  
  7. Be patient!  Consigning is a process that takes place over the course of a week or longer.  Here is an example from one sale.  I am scheduled to drop off items on Saturday and it should take about an hour.  I will shop the sale the following Wednesday for several hours.  The next Saturday I work a 4 hour shift.  The following Wednesday I will pick up my unsold items and check.  I personally find the reward to greatly outweigh the work, but that may not be true for everyone.  
I hope you give it a try and have fabulous results.  Please comment with your own consigning suggestions, tips or questions!

Happy selling!

Friday, September 13, 2013

How To Shop Consignment Sales

I just finished shopping my very favorite children's consignment sale, and realized its the perfect opportunity to share one of my passions with you.  
Now wait, I know what you are thinking when I say consignment... you're picturing those over priced consignment stores that offer next to nothing for your clothes and then re-sell them at ridiculous prices.  

No, no, no!  There is another way!  

There are large bi-annual consignment sales, usually spring and fall, that sell gently used children's clothing, toys, and gear.   The sales take place in expo centers, abandoned big box stores, school gyms, and generally last 3 or 4 days.  Most sales allow between 250 and 2000 consignors (sellers), so the size of each sale varies widely.   Large or small though, the deals can be amazing!

I purchased 37 items for $126!  That's an average of just $3.40 per item.  A few of the items are bargain brand, but most are name brands including Ralph Lauren, Gap, and Gymboree.  I found 5 sets of button down shirts for the twins,  khaki pants, dresses for Sissy, skirts and sweaters for school uniforms, and even a few fun items like a Santa dress, and everything looks brand new!


So, now that you're sold, here is the bad news... its not always easy to get the best deals.  The sales can seem daunting, and the pricing can be all over the place.  Here are a few tips to make you a successful consignment shopper!

  1. Find a sale in your area!  Just hop on Google and search for children's consignment sales in (your city here).  If you live in a very small town, consider finding a sale within driving distance.  It will be worth it.
  2. Research the sales!  Ask your mommy friends, read online reviews, and find out what each sale does best.  Some sales are very picky about the clothes they accept, so you waste less time searching through stained or worn out clothes.  Some sales have more gear like high chairs, strollers, car seats, and cribs while other are mostly toys and clothes.  Find a sale that fits your needs.
  3. Volunteer!  Most sales are fully staffed by volunteers, and the volunteers get to shop before the sale opens to the public.  Usually, you can earn the right to shop early by working one 3 or 4 hour shift.  I can not impress on you enough how important this is.  The very best deals will be purchased by the early shoppers.
  4. Make a list!  Sit down and think about what you need before you go.  The sales are often huge and overwhelming, so its easy to get distracted if you don't have a plan.  Write down the items you are looking for and even the size you want, so you have a quick reference in the moment.  It will also pay off to look at a map of the sale and plan your attack.
  5. Know your brands!  You will get the best deals if you are generally familiar with common brands and prices.  For instance, $3 for a GAP brand polo is great, but $3 for a Faded Glory brand is just okay.  Assume most items will be offered at less than 40% of retail value.  I stumbled across this consignment pricing guide which is broken down by item type and brand tier if you want to brush up a bit ;)
  6. Be patient!  I usually block out 3 or 4 hours to shop kid free.  It will take a long time to look through all of the clothes, toys, etc., and because the sales are staffed by volunteers, it will probably take a long time to check out.  I waited 30 minutes to check out this last sale.  Consider this though, you can purchase a whole season of clothes in one sitting at remarkable prices... its worth 4 hours! 
I hope this helps you become a very successful consignment shopper.  Let me know if you try it!  

Oh and one more thing, many of the sales will let you shop a private "new mom sale" if you are pregnant, but they only take the first 200 or so to sign up!

Happy shopping!

Wednesday, August 14, 2013

Sissy's First Day

Its official, we survived the first day of Kindergarten!  Well, Sissy did much more than survive, she thrived.  Despite some butterflies and trepidation this morning, Sissy looked calm and confident as she walked into her class.  When I picked her up, she was all smiles!  She was so proud of her good behavior stamp.  She even exclaimed, "I wish it was yesterday so I could be back at school right now."  ;)  I am fairly certain she meant tomorrow.  All evening she kept asking if it was night yet because, "I can't wait for it to be the next day of kindergarten."  For my shy child this is nothing short of miraculous! 

My feelings about kindergarten are a bit more complicated.  I am shocked that the sweet baby girl I gave birth to is a tall, well spoken, precocious kindergartener.  Its seems like only yesterday she was an infant snuggled in my arms, a wobbly toddler, an inquisitive pre-schooler.  I'm not sure how she grew up so fast, but I really don't approve.  On the other hand, I am so proud of the little girl she has become.  She is smart, funny, and a joy to be around.  I am so excited to watch her blossom even more as she learns new things this next year.  I can't wait to have her read me books, practice math problems, and quote science facts.  I am confident she will excel and develop a deep love for learning.  


Underneath all the other emotions is a deep and overwhelming sadness.  I am going to miss my little girl desperately!   With Sissy, I was given the utterly unique gift of raising a person who would become my best friend, a person I had waited my entire life to meet.  Sure, I am her caregiver.  I set boundaries.  I discipline her when I have to.  Ultimately though, we've spent most of the last 5 years talking, playing, and having fun together.  We "get" each other.  We share countless inside jokes.  We both enjoy books,
crafting, snuggling, puzzles, chocolate and romantic movies.  We treasure our time together.  When the twins were born, she was only four and yet she was a great source of sanity for me.  She loved them like they were her own boys, and felt tremendous pride.  We talk about how fast they are growing, and reminisce about how cute they were as babies.  She tells their names when strangers ask, and loves showing off how many words they can say.  She is the cutest miniature mama.  Somehow, she has always seemed a bit like an adult trapped in a tiny body.  Short of my husband, that tiny adult is my favorite person be with.  Now with her gone at school, there is a great void left behind.  Oh, and also deafening silence.  Literally.  Sissy started talking four and a half years ago and never stopped.  I know it is selfish and irrational, but I am literally jealous of her time away.  I am just so very accustomed to spending each waking moment with her.


All that said, I love my boys very very much and I am looking forward to some one on two time.  Somehow its just different with them.  From day one with the twins, I felt like their Mama, provider, protector, nurturer.  But they are a bit foreign to me.  They are wild, unrelenting waves crashing on my shore, or in other words, boys.  I know that over the next few years I will grow increasingly close to them.  I know that with Sissy gone, they will likely develop language at lightening speed.  I know that both the twins and myself with adapt to a different and much quieter home life.  I know that we will go on playdates, create inside jokes, and build a deep appreciate for action movies.  I know that we will find our own routine.  Tomorrow, I will wake up with a plan for our "new" adventure, but for tonight, I will mourn the loss of Sissy time. 

Monday, August 12, 2013

Labels for school


Quatrefoil_stylesheetWe are preparing for Sissy to begin Kindergarten on Wednesday, and her school requires that every item she brings to school be labeled.  Um yeah... that means every single individual crayon, marker, and glue stick.  The idea of hand writing her name on the curved surface of 50 crayons seemed miserable, so I decided to make labels instead.  I found these Moroccan tile labels on the World Label blog!  The downloadable template is a smart pdf, so you can just enter your text.  I chose to print mine on paper since I needed them so small, but each design fits perfectly on a label you can print at home.  I cut them out and taped them on. Voila!  

Hope they help with your back to school prep!


Monday, August 5, 2013

Wemberly Worried: a book review

On our most recent trip to the library, we stumbled upon a charming little book that is so very appropriate for the start of the school year.  The book is Wemberly Worried by Kevin Henkes.  

Wemberly Worried follows a cute little mouse named Wemberly who worries about everything.  She worries about little things, big things, and all things in between.  Most of all, Wemberly worries about going to school. 

"By the time the first day arrived, Wemberly had a long list of worries.  What if no one else has spots?  What if no one else wears stripes?  What if no one else brings a doll?  What if the teacher is mean?  What if the room smells bad? What if they make fun of my name?  What if I can't find the bathroom?  What if I hate the snack?  What if I have to cry?"   


In the end, Wemberly makes a friend who also worries and also wears stripes.  Our favorite page says, "Wemberly worried.  But no more than usual.  And sometimes even less."  Ha, I love it!


Sissy's picture of Wemberly.

This book was the perfect conversation started with my own little worrier.  She related with Wemberly, laughed at her a bit, and rejoiced when she found a friend.  It also allowed us to talk about all of her own worries about school, which in many cases mirrored Wemberly's.  Sissy worries about finding her class after drop off, knowing where the bathroom is especially during P.E., meeting her teacher, standing up to bullies, and mostly about missing her brothers.  Thanks to Wemberly, Sissy and I were able to address many of her worries before the start of school. 


I highly recommend picking up Wemberly Worried if your own little worrier starts school this fall.


Thursday, August 1, 2013

Campfire Cones

Over the summer we perfected the art of s'mores!  We had them with Peeps, different chocolate candies, different marshmallows, graham crackers, Ritz crackers, and they were all delicious.  And then we discovered campfire cones!  Basically, you take all the delicious elements of a s'more, stuff it in a sugar cone, and let it melt together!  These became the hands down favorite.  We've served them to visiting family, eaten them on camping trips, and made them in the oven at home.  No matter what the occasion, these ooey gooey treats are remarkable.  In the spirit of celebrating the few remaining days of summer, I thought we'd enjoy them again this weekend, and it seems only fair to share!

Campfire Cones

Ingredients:
  • Sugar cones
  • chocolate chips
  • peanut butter, Nutella, or Sunbutter
  • banana
  • mini marshmallows
  • chocolate candies (Reese's, Rolos, etc.)
  • Aluminum foil
Method:
 
First, spread a little bit of peanut butter, Nutella, or Sunbutter inside the cone.  Fill in the cone with alternating layers of diced banana, chocolate chips, chocolate candy of your choice, and mini marshmallows.  


Take care to gently pack the marshmallows tightly as they will melt into almost nothing.  Fill the cone all the way to the top.

 
 Lay the cone on a square of aluminum foil.  Use a reasonably large piece of foil as the extra layers will help protect the cone from burning.


Wrap securely.  Cook for approximately 10 minutes either around the edges of a campfire, on the surface of a grill, or in the oven at 350 degrees.


Remove the cone from the fire and check its meltiness.  If its ready, let it cool a moment and then eat the ooey gooey deliciousness.  

Personally, I think the banana is perhaps the most shockingly wonderful part, but its all pretty yummy.  The cones are especially great for kids since all the mess in contained in a neat little package.

Hopefully you can all find an evening to enjoy campfire cones and reminisce about the wonders of summer!
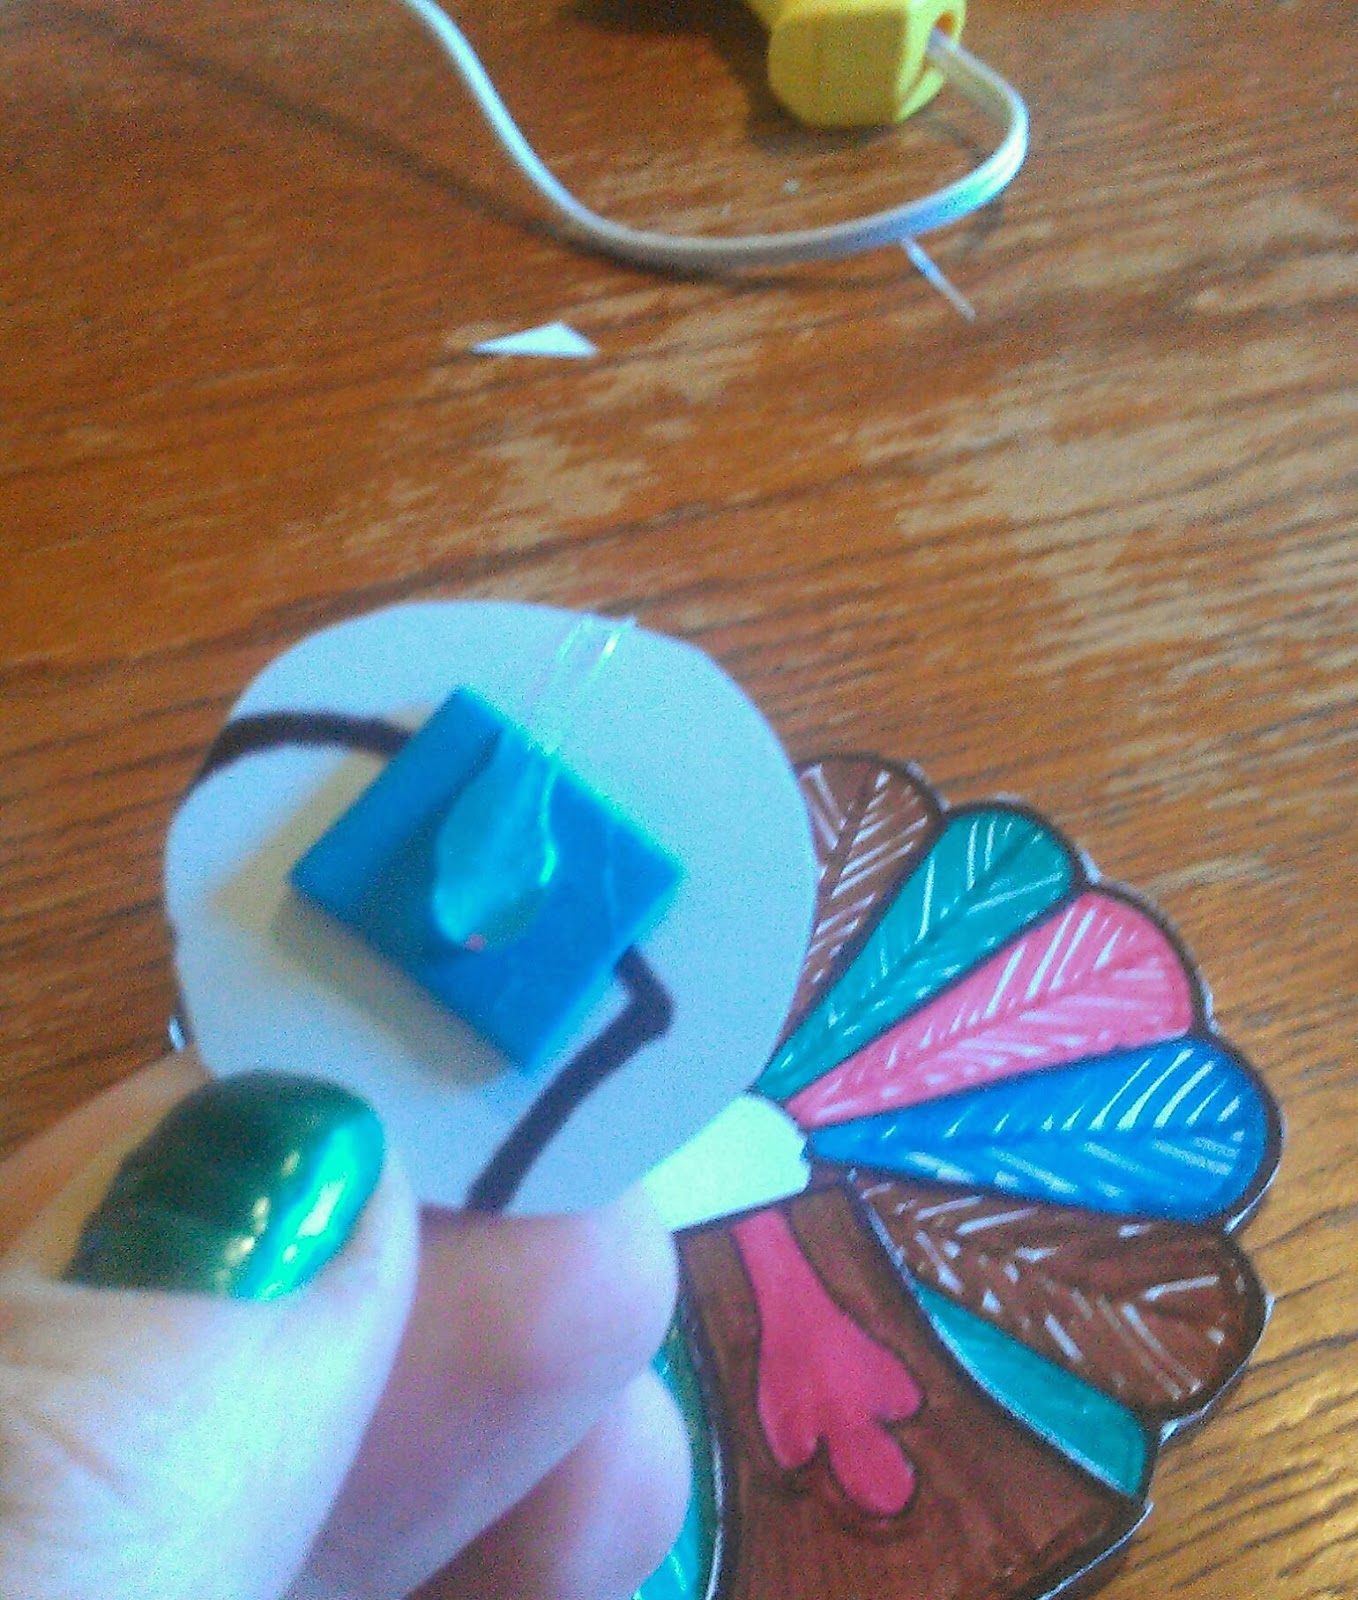