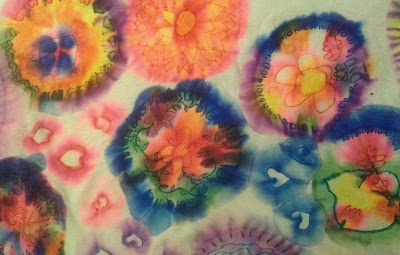
 For the past two days Sissy and I have been working on the
most fun DIY t-shirt craft ever! It’s
simple, the possibilities are endless, and the results are beautiful. So without further ado… Sharpie Tie Dye!
What you need:
- White t-shirt (or other clothing item)
- Sharpie permanent markers (any and all colors)
- Rubbing alcohol
- Dropper
- Rubber bands
- Bowls or cups
Method:
Place a bowl or cup between the layers of the t-shirt, and
secure the fabric firmly across the bowl with a rubber band around the
rim. The tighter you get it, the easier
it will be to draw.
Draw a picture or pattern on the fabric. Focus on outlines, not filling in with color.

When the picture is complete, drip droplets of alcohol onto the picture. The ink will spread and look like a tie dye pattern, but with the original picture still viewable.
 |
| Before alcohol |
 |
| After alcohol |
Allow the picture to dry. We used several bowls so we could do multiple images at once. When dry, remove the rubber band and move on to another spot.
Result:
 |
| Sissy's flower garden tie dye |
The effects really are amazing! My mom couldn’t believe that Sissy had made
this by herself.
 |
| Gigi's turtle. |
We covered the whole
front and back of one of Daddy’s undershirts with round images about 5 inches
across. In the spaces between, we drew
hearts.
I will eventually make Sissy a
bathing suit cover with this fabric, so more on that later.
 |
| Our Sharpie tie dye fabric |
Like I said, the possibilities of this craft are
endless. I am thinking the twins need
some customized onsies next, or maybe a white sundress for Sissy with a pattern
of tie dye around the bottom, or maybe an infinity scarf for me… whatever I
pick, you know I’ll share it!
Happy summer!


I LOVE this craft
ReplyDeleteThank you! We had so much fun!
DeleteAwesome! Love me some tiedye!!!
ReplyDeleteRenee